When decorating a cake, the baker must use many different tools. I will go over some of the Basic Cake Decorating Tools. We will go over decorating pastry bags and tips, some decorating and baking tools, bakewares and pans, and Mits, coloring, zest and a cake leveler.
Decorating Pastry Bags and Tips
-
- Decorating Bags and Tips
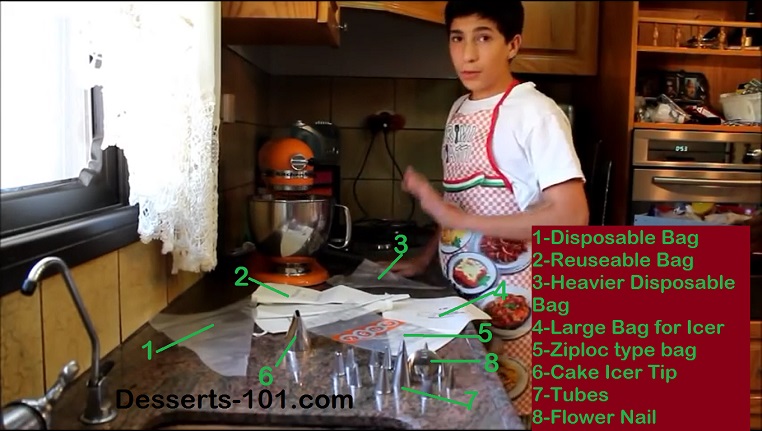
Pastry Bags come in many different style. From disposable to long tasting heavy duty. You can even make you own out of parchment paper or a disposable ziploc type plastic bag. From the picture above we see the following:
- Disposable Bag – most of the time these come on a roll or in a package. They are convenient since you throw them out when you are done. You can be frugal and gently clean them and reuse a few times. Disposable bags work great with royal icing since they are grease free to start and grease breaks down royal icing.
- Reuseable Bags – Many different materials to choose from. Canvas, plastic, plastic coated etc. When they are new they are very stiff and may take a little time to break in. To clean, use plenty of hot soapy water.
- Heavy weight disposable bag – this one is easier to clean and reuse than the thin disposable ones.
- Large Pastry Bag – This one is dedicated to an icer tip since once the bag is cut no other tips will fit. Choose a large bag since you go through plenty of icing quickly.
- Plastic bag – Ziplock® or a zipper bag. Really anything will do.
- Cake Icer Tip – this is a large basket weave tip (one smooth side and one toothed side) used to ice cakes and cupcakes quickly. It takes a dedicated pastry bag to use.
- Decorating tubes – They come in all different sizes and designs. There are many different brands out there. The tubes are usually numbered, however there is no standardization in the numbering from manufacturer to manufacturer. Ateco and Wilton are 2 of the biggest manufactures out there. You can find them in nickel plated, stainless steel, polycarbonate, plastic and other materials for the tubes.
I did not show but there are quick change couplers. The couplers come in different sizes and made by the manufacture for its own tubes. A good example here is that Wilton makes many different drop flower tips. The Wilton coupler has a slot in it and the Ateco coupler does the. The reason for the slot is the drop flower tubes have a metal piece welded inside the tube which slides in this slot.
Also when you get into the larger tubes, they come in more sizes and may not fit even the manufactures couplers. You do not need a coupler to use a tip, just trim the end of a bag to fit the tip. Use caution because if you trim too much up, well there is no adding it back and you are left with a bag you will have to put an even larger tip in.
Some Decorating and Baking Tools
-
- Decorating/Baking Tools
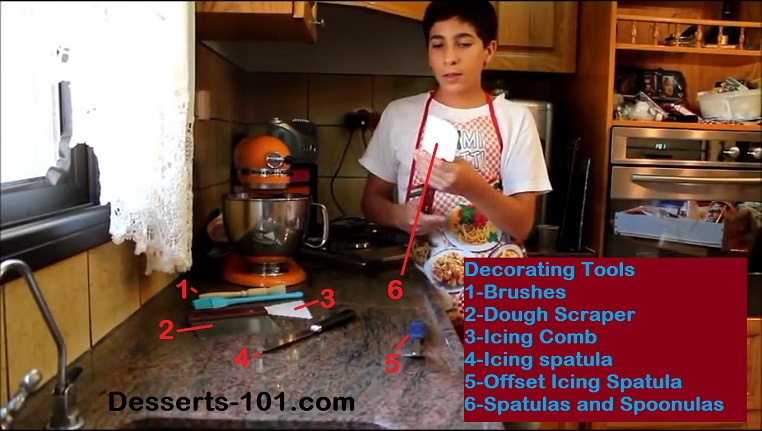
- Brushes I am showing a silicon brush – this works well for some things, the bristles do not comes out and it is heat safe. Also shown in a round brush – this works great for greasing a pan. You will find that there are many different types of brushes available. Just choose ones that are food safe.
- Dough or Bench Scraper – This is an essential tool in a bakers kitchen. You can use it to scrap dough off the table top to pushing and gathering flour to even as a transport shovel. You can find them with plastic, metal or wooden handles.
- Icing or Decorators Comb – Here is a 3 sides triangular comb. Each side has a different pattern on the edge. You run this around the cake in the icing to create ridges and a pattern. Available in metal and plastic. Different shapes include triangular, square, and rectangular. There is even an interchange kit available to customize you own.
- Icing Spatula – This is a flat one. The blade is flat.
- Offset Icing Spatula – You will notice that the handle is offset from the flat blade. This is useful since you can be spreading something on a flat surface and keep you hands off the surface.
- Spatulas and Spoonulas. I think everyone knows what a spatula is. It is the famous scraper we use to scrap bowls. Well it has a buddy called a Spoonula. A spoonula looks like a spatula but it has a cupped flat side on the spatula end. This is useful for transferring icing. Look for these in a bakery or restaurant supply store.
Also keep an eye out for heat resistant ones. They are not that much more expensive from the regular ones at a restaurant supple store. The problem I found with them is they are 2 pieces and with enough use the end may come off and then it is time to replace it.
Bakeware – Pans
-
- Baking Pans
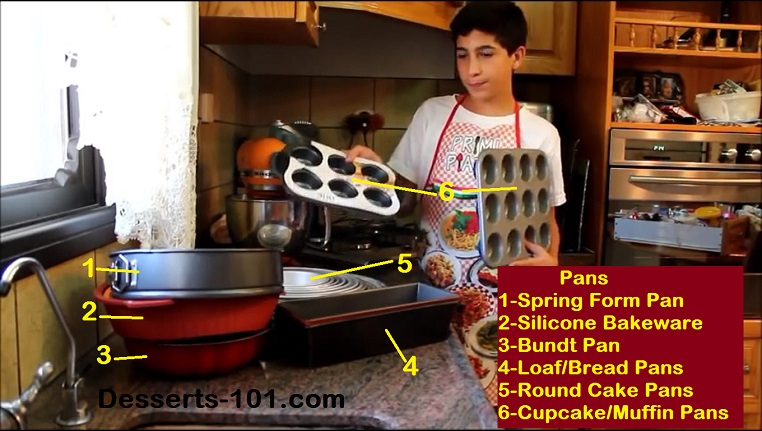
These are just a few of the many different types of pans you can use.
- Spring Form Pan – A spring form pan is used a lot of times in making cheesecake and desserts which you want to unmold that you may have difficulty in removing from a pan. The spring form band separates from the bottom leaving your creation on a bottom to serve.
- Silicone Bakeware – Available in many different sizes, shapes, designs and colors. Some say the items do not brown as well. Some of the designs may make it difficult to clean. Always place silicone bakeware on a baking sheet to give it added support going in and out of the oven.
- Bundt Pans – Very similar to an angle food cake pan. It has a center hole. It comes in several different sizes. The stand is a 10-cup size. I have a smaller 6-cup which is great for a few people, and if i cheat and use a box mix, it works wonderfully here. These pans are also available in many different patterns. You grease the pan and once baked and removed and cooled, a light dusting of confectioner’s sugar keep the dessert light.
- Load-Bread Pans – Many different shapes and sizes out there. The main sizes are 8 x 4 inches (1 pound), 8-1/2 x 4-1/2 inches (1-1/2 pound) and 9 x 5 inches (2 pound), There are larger hearth pans for rye or homestyle breads, pullman pans for those square loaves, round pans, fluted pans for panettone and even paper pans out there. Also coffee cans and pots can even be used to bake bread in.
- Round Cake Pans – They come in all different sizes, 1-1/2, 2, 3, 4 0r 5 inches high, And diameters from3 inches to 24 inches. Any pan over 14-inches you must make sure will fit in your oven. Most home ovens that is the maximum size pan. Some bigger size pans are available in half sizes where you make 2 halves to make one layer.
You can also find pans in other shapes, diamonds, square, petals, beveled edges etc,
There are special shaped pans also available. But you will not see bakeries using them. The big reason is copyright issues. They are great for the home baker and your own personal use. This is why bakeries will carve cakes. It is more expensive and time consuming, but helps limit copyright infringement and liabilities. - Cupcake and Muffin Pans – The standard cupcake pans come in 6 or 12 cup. Mini-cupcakes come in 12 or 24 cup. Jumbo muffins can come in 4, 6 or 8 cups. If you are going to use a cupcake liner to determine the size, measure the diameter and the height on both sides. This a cupcake pan with a 2-inch diameter and 1-1/2-inch sizes would use a cupcake liner that is 5-inch. Not everyone uses this but it is good to know if you are checking out commericial site for liners. Liners are available in all different colors, patters, sizes. You may have to spray your liners with release spray before filling to ensure they peal sway.
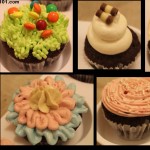
Mitts, Coloring, Zester and Cake Leveler
-
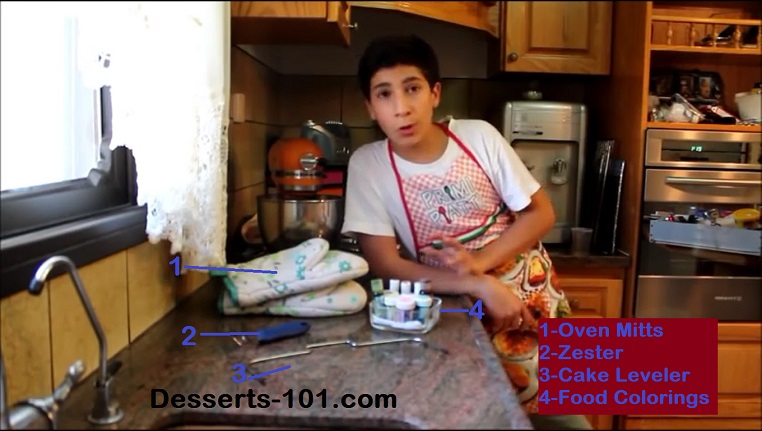
- Coloring, mitts, zester and cake leveler.
These are just a few more tools we need. This list can go on and on. I am going to limit to a few more main items.
- Oven Mitts, Pot Holders – Oven mitts are great for helping get pans in and out of the oven. They are available in different materials, lengths and sizes. Choose what fits you style. Pot holders (not sure) are also very useful. They come in different sizes, materials, etc. Some are easier than others to use. Some will be more resistant to higher temperatures or to hot temperatures for a longer period of time.
- Zester – Zesters are used to get the outer skin of a citrus fruit (oranges, limes, lemons, etc.) This is where you do not want the bitter white pith. There are different kinds of zesters, The one shown here makes smaller ribbons, You can find some that make a thicker larger ribbon. A microplane grater will work great to give you a very fine zest.
- Cake Leveler – This helps cut that high dome off the cake or cut a cake into several layers. Do you need a fancy tool like this? No. you can use a serrated knife and a lazy susan to cut the layers that way. With practice you will become an expert. Don’t throw away that cake done you remove. You can make cake crumbs or turn them into cake pops.
- Food Colorings – Many different type to choose from.
- Paste Colorings – This is a concentrated paste. Use small amount to get your color.
- Gel Coloring – Similar to paste but a more flowing. Usually they come in a squeeze bottle. A little goes a long way.
- Liquid Colorings – The ones we are most familiar with from growing up. The 4 bottle dropper packs from the supermarkets. They did the job, but if you wanted a deep color you used the whole bottle and thinned out your icing.
- Powder Colorings – Powders in a tube.
View me explain these items here.